How to create a LinkedIn Company Page.

To create a LinkedIn Company Page:

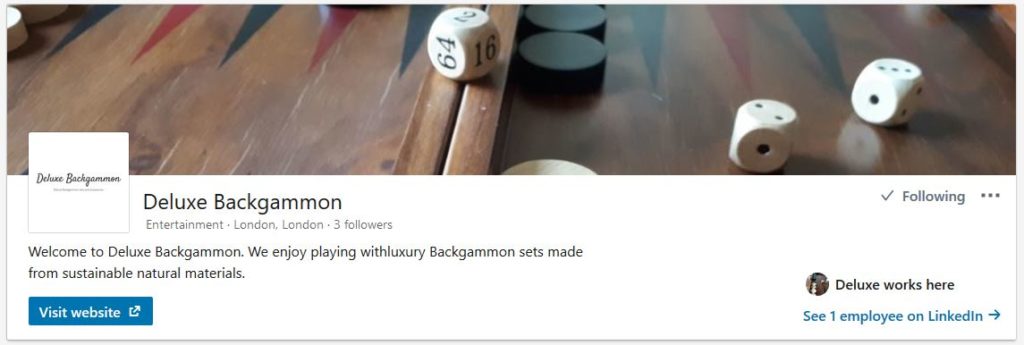
Note we created the Deluxe Backgammon Company Page using these steps:

Deluxe Backgammon LinkedIn Company Page.

1. Click the Work icon in the top right corner of your personal LinkedIn page.

2. Select Create a Company Page.

3. Select the page type you’d like to create from the following list:

• Small business (< 200 employees)

• Medium to large business (> 200 employees)

• Showcase page (sub-page associated with an existing Company Page)

• Educational institution (high school or universities)

4. Enter your Page identity, Company details, and Profile information.

5. Check the verification box to confirm you have the right to act on behalf of the company in the creation of the page.

6. Select Create page.

• If you don’t have a confirmed email address associated with your LinkedIn account, you’ll be prompted to add and verify your email address.

• A red error message may appear if your LinkedIn account has recently been created or you don’t have enough connections. (The account you are using to create the Company Page must be at least 7 days old and have multiple connections).

LinkedIn.

How to create a LinkedIn Company Page.

LinkedIn.

To create a LinkedIn Company Page:

1. Click the Work icon in the top right corner of your personal LinkedIn page.

2. Select Create a Company Page.

3. Select the page type you’d like to create from the following list:

• Small business (< 200 employees)

• Medium to large business (> 200 employees)

• Showcase page (sub-page associated with an existing Company Page)

• Educational institution (high school or universities)

4. Enter your Page identity, Company details, and Profile information.

5. Check the verification box to confirm you have the right to act on behalf of the company in the creation of the page.

6. Select Create page.

• If you don’t have a confirmed email address associated with your LinkedIn account, you’ll be prompted to add and verify your email address.

• A red error message may appear if your LinkedIn account has recently been created or you don’t have enough connections. (The account you are using to create the Company Page must be at least 7 days old and have multiple connections).

Additional notes and conditions:

• All required fields are indicated by an asterisk.

• Page URLs will be structured as linkedin.com/company/[YOUR COMPANY NAME]. The public URL for your Page:

• Page URLs must be unique and can’t already be in use for another LinkedIn Page.

• Must contain at least one non-numeric character.

• Can use lowercase alphabet, numeric, hyphen, or Chinese, Japanese, or Korean (CJK) Unicode characters.

• Must not include more than one consecutive hyphen (i.e. company–name) and can’t have a hyphen at the beginning or end (i.e. -company-name or company-name-).

• Any improper characters will be automatically replaced with a hyphen.

After creating your Page, you can enter further details to build your brand by selecting Start building your page. There are options to provide a logo image, a description, location details, and more.

Using LinkedIn for Marketing: Setup.

1.     Create a generic user. For instance, we created Deluxe Backgammon using the generic admin email address for the website.

2.     Select View Profile and populate all of the requested fields until you reach an All Star status. Ensure you include your logo or a suitable image in the photo. Add your website to create a backlink. There should be multiple opportunities to do this. For example, add the website to a list of current projects.

3.     Start connecting. Firstly, connect via your personal LinkedIn account and then request connections from other people you know closely (a spouse, friends or family). Initially you want to establish 3 – 6 connections. At this point you will not be eligible to create a company page from the new account. LinkedIn will expect your account to have several connections and have been active for at least on week.

4.     After seven days have passed. Create the LinkedIn company account and populate all of the requested fields.

5.     Now that you have a member account and a Company page it is time to start building your connections. Use the search field to target specific terms related to your business, for example we searched on backgammon to find a list of people, companies and groups that had an interest in backgammon. Search on multiple terms associated with you website.

Note: LinkedIn has a commercial use limit. The limit kicks in when you’re exceeding normal search activity, which LinkedIn interprets as hiring or prospecting. The limit resets at midnight on the first day of each calendar month. You’ll get a warning as you get closer to the limit.

6.     Start connecting. You can personalise each connection request, but will slow down the process. Limit the personalised message to key personnel associated with your field. Many LinkedIn users will accept connection requests without question. It’s possible to generate 50 connection requests in a matter of minutes using this method. We estimate that at 25% of requests will be accepted.

Note: Always send a personalised message to key contacts, this will greatly increase the likelihood of acceptance.

7.     If the commercial use limit kicks in or you exhaust your connections opportunities via the search function you can switch to the My Network page of your profile. Here linked in will make suggestions for potential connections. For example, scroll down to the More suggestions for you and start selecting people with whom you share multiple connections. Alternatively, select people that LinkedIn has suggested based on your profile. Again, it is possible to generate 50 connection requests in a matter of minutes using this method.

8.     Select a target number, for example 200 connections and apply the above methods until you reach your goal. At this point you should start receiving unsolicited connection requests. We were able to reach a target of 200 connections in less than two weeks using the above steps.

9.     Next steps…